iOS disclosure indicators done right
This story might be outdated:
This code was last updated for Swift 3 with Xcode 8.1.
Disclosure indicators are very common in an iOS application, and they allow the user to know that if they select a cell, they will be pushed somewhere else. You can also read Apple documentation about them.

A cell with a disclosure indicator
Adding a disclosure indicator may seem easy at first, but when you want to make a universal app supporting iPhone and iPad, things become trickier, and we’ll see how to make it right !
Beginning the project
To begin the project, you can either create a Master - Details template
application with Xcode, or download/clone this Github repo at the branch start
If you build and run for iPhone, and use the app a little, you’ll see that apple hasn’t added a disclosure indicator to their project. But if you select a cell, a new view controller will be pushed. Not quite like described in the human interface guidelines. Maybe it’s the sign that it’s not that easy to do ? :)
Adding a disclosure indicator
In the function tableView(_ tableView: UITableView, cellForRowAt indexPath: IndexPath),
simply add right before returning the cell:
override func tableView(_ tableView: UITableView, cellForRowAt indexPath: IndexPath) {
  (...)
  cell.accessoryType = .disclosureIndicator
  return cell
}
Now, build and run for iPhone. You have disclosure indicators for your cells ! Easy as pie !
Now, let complicate things. We want to make a universal app, and this template
use a UISplitViewController for that purpose.
Adapting disclosure indicators for split view presentation
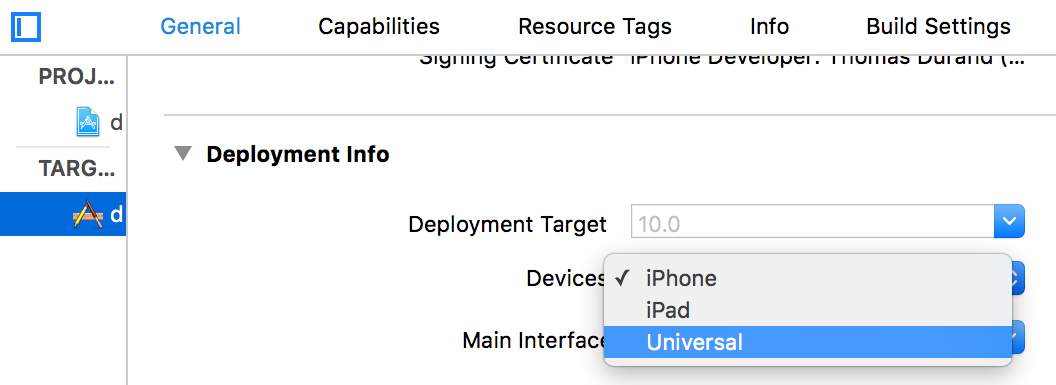
Let register the app as Universal, because right now it’s just an iPhone app.
In the project settings (the most top element in the file list), change devices
to become Universal
Build and run the app for iPad. You should see that every cell have a disclosure indicator, which is not what we expect in a Master-Detail split-view app on iPad.

Notice the indicator absence in settings app.
To make the magic happen, we need to detect when the view controller is currently presenting in a split view controller, and if it is, if we have two view controllers visible.
To do so, I would use this piece of code in the MasterViewController:
/// Will return false if no split view or if split view is collapsed like on iPhone
var isInSplitViewPresentation: Bool {
  return !(splitViewController?.isCollapsed ?? true)
}
If there is no split view controller, the ?? operator will make the parenthesis return true.
And isInSplitViewPresentation equals the inverted boolean, so it will be false.
When there is a split view controller, which is always the case in our example, this piece of code
will look at the value of isCollapsed.
isCollapsed will be true when the split view present only one view controller at a time, which is
the case on iPhone (except iPhone 6 plus in landscape, but we’ll come to that later).
Then, with this piece of code, replace in tableView(_ tableView: UITableView, cellForRowAt indexPath: IndexPath)
the code we wrote before for the accessoryType:
override func tableView(_ tableView: UITableView, cellForRowAt indexPath: IndexPath) {
  (...)
  cell.accessoryType = !isInSplitViewPresentation ? .disclosureIndicator: .none
  return cell
}
Now build and run for iPhone, or for iPad, and it works as expected … well, almost as expected !
The iPhone 6(s) plus exception
The iPhone 6 plus is a (very) big device and is the only iPhone that is able to show split views in non-collapsed mode.
Let give it a try. Build and run for iPhone 6 plus model, and create a few cells with the + button. You should have disclosure indicators in the cells.
Rotate the device with cmd + -> or cmd + <-.
The split view now shows the two view controllers, but the cells still have disclosure indicators.
If you create more cell, or if you scroll, the cells that appear on screen won’t have them.
If you return the device in portrait; the cells that had indicators still have, but the others don’t and they should.
The code we use works okay, it’s just that when the device change it’s state, we need to update the cells to reflect the changes.
First, let move the logic of the disclosure adding.
Let create an extension for the cell that handle the cell accessory type:
extension UITableViewCell {
    func setDisclosureIndicator(visible: Bool) {
        accessoryType = visible ? .disclosureIndicator: .none
    }
}
And in the tableView(_ tableView: UITableView, cellForRowAt indexPath: IndexPath)
replace
cell.accessoryType = !isInSplitViewPresentation ? .disclosureIndicator: .nonewith
cell.setDisclosureIndicator(visible: !isInSplitViewPresentation)Looks a little bit better.
Now, add in the MasterViewController this code that handle the change portrait/landscape:
/// Will be called each time the size of the view controller changes
override func viewWillTransition(to size: CGSize, with coordinator: UIViewControllerTransitionCoordinator) {

  // We use the coordinator to keep track of the transition
  coordinator.animate(alongsideTransition: nil, completion: { _ in
    // In the completion of the transition,
    // We loop on each cell
    self.tableView.visibleCells.forEach {
      // And we refresh the disclosure indicator of those cells
      $0.setDisclosureIndicator(visible: !self.isInSplitViewPresentation)
      }
  })

  super.viewWillTransition(to: size, with: coordinator)
}
This code is interesting because prior to iOS 8, we had the viewWillRotate and the
viewDidRotate functions. But those two have been depreciated and replaced by
viewWillTransition.
The problem is that we do not have a viewDidTransition method
that would be called at the end. But we do have a transition coordinator in parameter.
The idea is to use this coordinator in order to call method at the end of the animations.
To do so, we animate alongside transition, but we do not give any animation, just a completion handler. So the refresh of the cells will be made at the end of the transition, so we are sure our code will remove, or add disclosure indicators only if needed.
Build and run the app for iPhone 6 plus and rotate as you like to see the disclosure indicators doing things just right.
Bonus: iOS 9 Split view mode on iPad
Since iOS 9, some iPad models can became in Split view mode. It allow two apps to be displayed at the same time in the screen.
The thing about that is on iPad air 2 and iPad mini 4, when two apps are displayed side by side at 50/50, they are displayed in iPhone mode and the split view will be collapsed.
A good thing about our previous code is that is also works nice with this transition. It means that without any code side change, we can make our app works with Split View mode.
To try this out, go back in the target settings, like we did before and check the upside down rotation.
Indeed, to work, split view need all 4 orientations supported. Don’t ask me why, I don’t have a clue.
Build and run for iPad air 2 or iPad mini 4 (the two non-pro devices that support split view at this time) and trigger the split view with a pan gesture from the right border of the screen.
When the app become collapsed, the disclosure indicators appears as we could expect them to.
Wrapping this as a Protocol
Our solution is not perfect yet: it assume that every cell can be disclosed in our table view, which will not be always the case in all table views.
Then, the approach of a global extension is not a very “local” approach, and keeping your code local is the best way to make it simpler to maintain.
Let remove completely our extension of UITableViewCell and create our protocol:
/// Represent a cell that can be disclosed
protocol DisclosableCell {
    var canDisclose: Bool { get }
    func setDisclosureIndicator(visible: Bool)
}

extension DisclosableCell where Self: UITableViewCell {
    func setDisclosureIndicator(visible: Bool) {
        accessoryType = canDisclose && visible ? .disclosureIndicator: .none
    }
}
Of course, we need a subclass of UITableViewCell to make it work in our example from below:
class MyCell: UITableViewCell, DisclosableCell {
    var canDisclose: Bool {
        // All of our cells disclose
        return true
    }
}
Make sure to change the class of the cell in the storyboard:
Select the prototype cell, and in the Identity Inspector, set the class of the cell
as MyCell.
Finally, replace the viewWillTransition implementation with:
/// Will be called each time the size of the view controller changes
override func viewWillTransition(to size: CGSize, with coordinator: UIViewControllerTransitionCoordinator) {
  // We use the coordinator to keep track of the transition
  coordinator.animate(alongsideTransition: nil, completion: { _ in
    // In the completion of the transition,
    // We loop on each cell
    self.tableView.visibleCells.forEach {
      if let cell = $0 as? DisclosableCell {
        // And we refresh the disclosure indicator of those cells
        cell.setDisclosureIndicator(visible: !self.isInSplitViewPresentation)
      }
    }
  })

  super.viewWillTransition(to: size, with: coordinator)
}
And inside tableView(_ tableView: UITableView, cellForRowAt indexPath: IndexPath):
override func tableView(_ tableView: UITableView, cellForRowAt indexPath: IndexPath) -> UITableViewCell {
  (...)
  if let cell = cell as? DisclosableCell {
    cell.setDisclosureIndicator(visible: !isInSplitViewPresentation)
  }
  return cell
}
And this is it! You have a full and reusable implementation of our special disclosable cells, that is now a protocol that many cells implementation can conform. The good point with this is that a single UITableViewController that handle many different cells with some can disclose, other aren’t in a universal app; with the correct and expected behavior.
You can clone the repo with the full implementation of this protocol on github
If you have any idea of improvement we can achieve on this implementation, make sure to open an issue directly on Github, and we’ll discuss about it! :)
Don’t miss a thing!
Don't miss any of my indie dev stories, app updates, or upcoming creations!
Stay in the loop and be the first to experience my apps, betas and stories of my indie journey.