iOS basics: UITableView setup with Swift 3
This story might be outdated:
This code was last updated for Swift 3 with Xcode 8.1. This code would be today either made using SwiftUI, or using UITableViewDiffableDataSource
Now that I begin to feel very familiar with Swift syntax and iOS app design; and that I am totally convinced by how easy it is to do swift code, I want to share with you how to use it to make one of the more common UI and UX of iOS: a TableView presentation for iOS !
This is the first article about iOS development on this blog and I really hope I will manage to write more.
Note: There is two methods to implement a dynamic table view: using a UITableViewController, or using a UIViewController that implements UITableViewDelegate and UITableViewDataSource. I will explain this second solution in this tutorial, not because it’s the simplest, but because it allow way more customizations for the layout of the TableView if you need to.
What we’re gonna build from scratch
We are going to achieve today is the list of all elements from the periodic elements, ordered by atomic number.
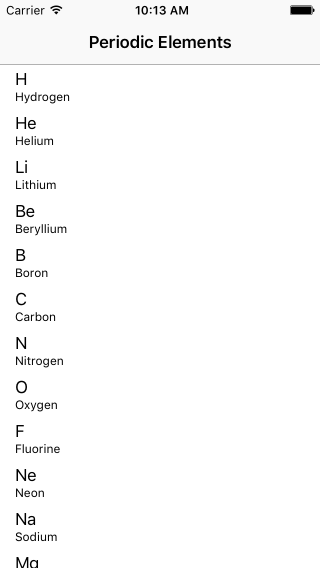
Expected result: a simple table view
Thankfully, we’re not going to implement all of the atoms data in the code. Instead, we are going to fetch it from a plist file from an Apple sample code:
First: about MVC
MVC for “Model View Controller” is a pattern design that allow to separate different aspects of the code in an application:
- Model: Represent the data you want to display. In swift, it’s recommended to make struct oriented models instead of class oriented model; but it depends on what you’re trying to achieve
- View: Here in our tutorial, the view will be the
UITableView. Views are what are presented to the user, and the user can interact with it. - Controller: To simplify, it’s the glue between your model, and your data. The user interact with the view, the view signal it to the controller, the controller update the data, and make the view follow those changes. When the data change, the controller is responsible to update the view accordingly
In iOS, MVC is the most common pattern design, and UIKit is designed to be pro-MVC. The controller will be a subclass of UIViewController.
Every instances of UIViewController contains a UIView instance. That will be our main view.
We will create a UITableView instance that will be a subview of the main UIView
Finally our data will be structured with a simple Swift struct.
Starting the project
Open Xcode 8 and create a new iOS project with the “One view” template. Name the project ElementsList.
Make sure that CoreData, Unit Tests and UI Tests are unchecked.
Xcode created a lot of files, that are listed on the left; It’s the very basic of an iOS app: A storyboard to design views, a view controller that is the first controller of the app, and an AppDelegate that take care of the logic of the app life cycle.
Open the StoryBoard, and you’ll see a simple iOS empty view. One of the many way to make the UI of an app is to design the views and all the relations between them directly in this file. But the only thing we will do is to add a Navigation Controller for our app, that will allow us to have the iOS top navigation bar, and eventually to push new view controllers in a later tutorial.
To do so, select the view controller, and in the top menu, select Editor > Embed in > Navigation Controller.
This should add a view controller with a navigation bar, and an arrow lead now to our previous view controller. You just created your first Storyboard relation, congrats !
Next step is the model layer
The model layer
A good start before implementing something is to think about how the data will be represented in our code.
If you didn’t already have, open the data file Elements.plist and take a look at it.
We have a structure of an array of dictionaries. Each dictionary represent an element, and contains a lot of data. A good start would be to have all the data available in our model, to make sure we fit our future needs without redesigning the model later.
To create the model, create a new Swift file in the project, named Element.swift. In this file, we will implement the model layer.
Here is an example of model I came up with:
struct Element {
    enum State: String {
        case Solid, Liquid, Gas, Artificial
    }

    let atomicNumber: Int
    let atomicWeight: Float // in g.mol-1
    let discoveryYear: String
    let group: Int
    let name: String
    let period: Int
    let radioactive: Bool
    let state: State
    let symbol: String

    // Position in the table
    let horizPos: Int
    let vertPos: Int
}
Every data type is pretty simple in this example: Bool, Integers, Float and Strings; but there is also an enum type. Enums are ideal when you only need to support a limited number of options. It’s the case here with an element state, that have only 4 possible values.
Note that I choose to make my enumeration inherit from String, witch mean each state is a string, and that we can try to convert a string to a State.
This model map all the data from the property list and will allow us to represent one element. But what about the elements loading ? Right now, the elements are in a plist file, so we’ll need to create something that allow us to receive an array of all elements
Loading the data
Great, we have a model, and we have a plist file that contains our data. But we still need to translate the data in order to take advantage of our model.
I would implement it that way:
extension Element {
    enum Error: ErrorProtocol {
        case noPlistFile
        case cannotReadFile
    }

    /// Load all the elements from the plist file
    static func loadFromPlist() throws -> [Element] {
        // First we need to find the plist
        guard let file = Bundle.main.path(forResource: "Elements", ofType: "plist") else {
            throw ErrorType.noPlistFile
        }

        // Then we read it as an array of dict
        guard let array = NSArray(contentsOfFile: file) as? [[String: AnyObject]] else {
            throw ErrorType.cannotReadFile
        }

        // Initialize the array
        var elements: [Element] = []

        // For each dictionary
        for dict in array {
            // We implement the element
            let element = Element.from(dict: dict)
            // And add it to the array
            elements.append(element)
        }

        // Return all elements
        return elements
    }

    /// Create an element corresponding to the given dict
    static func from(dict: [String: AnyObject]) -> Element {
        let atomicNumber = dict["atomicNumber"] as! Int
        let atomicWeight = Float(dict["atomicWeight"] as! String) ?? 0
        let discoveryYear = dict["discoveryYear"] as! String
        let group = dict["group"] as! Int
        let name = dict["name"] as! String
        let period = dict["period"] as! Int
        let radioactive = dict["radioactive"] as! String == "True"
        let state = State(rawValue: dict["state"] as! String)!
        let symbol = dict["symbol"] as! String
        let horizPos = dict["horizPos"] as! Int
        let vertPos = dict["vertPos"] as! Int

        return Element(atomicNumber: atomicNumber,
                       atomicWeight: atomicWeight,
                       discoveryYear: discoveryYear,
                       group: group,
                       name: name,
                       period: period,
                       radioactive: radioactive,
                       state: state,
                       symbol: symbol,
                       horizPos: horizPos,
                       vertPos: vertPos)
    }
}
That a lot of code, but it’s pretty strait forward, you just need to read it to understand it.
To test it, you can add in the viewDidLoad() method of your ViewController:
class ViewController: UIViewController {

    var elements: [Element] = []

    override func viewDidLoad() {
        super.viewDidLoad()
        // Do any additional setup after loading the view, typically from a nib.

        elements = try! Element.loadFromPlist()
        print(elements)
    }
}
When we check the Xcode console while executing, we find that the data is there ! Neat !
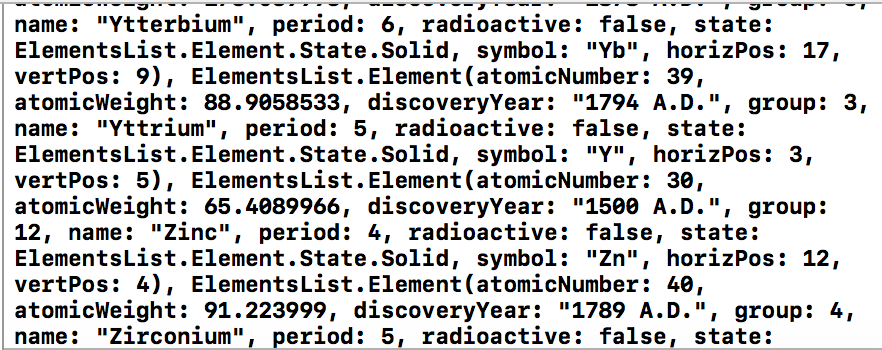
A bit verbose, but it’s here
Important: In Element.from(dict: _) function, there is a lot of force unwrapping ! in the code. That’s because the data is implemented code side and cannot be changed easily. But in a real world application, implement it that way could cause crash when the data is not what you expected, and it will happen !
Creating the table view
First, we need to create a UITableView instance, and keep reference to this instance. To do so, just add a property right below var elements:
    var elements: [Element] = []
    weak var tableView: UITableView! // We make it weak for memory consideration
Then we need to create the table view, by adding those line in viewDidLoad():
    override func viewDidLoad() {
        (...)
        let tableView = UITableView(frame: view.bounds)
        view.addSubview(tableView)
        self.tableView = tableView

        tableView.dataSource = self
        tableView.delegate = self
    }
As soon as you do this, the compiler should complain that ViewController class does not conform UITableViewDataSource and UITableViewDelegate protocols*
What should be do ? Well, let’s tell the compiler we implements them ! Add at the end of the file:
extension ViewController: UITableViewDataSource, UITableViewDelegate {

}
Right, now the compiler’s error have changed, and say we does not implement UITableViewDataSource protocol.
Configuring the table view
If we look in the documentation, we find out that UITableViewDataSource protocol contains two methods that are required to implement:
tableView(_ tableView: UITableView, numberOfRowsInSection section: Int) -> Int: Should return the number of rows in the given section of the table view. In our example, we just have one section, so the implementation will be simple:
func tableView(_ tableView: UITableView, numberOfRowsInSection section: Int) -> Int {
    return elements.count
}
tableView(_ tableView: UITableView, cellForRowAt indexPath: IndexPath) -> UITableViewCell: Should return a cell for the given IndexPath (IndexPath is a couple containing the number of the section and the number of the row)
func tableView(_ tableView: UITableView, cellForRowAt indexPath: IndexPath) -> UITableViewCell {
    // Getting the right element
    let element = elements[indexPath.row]

    // Instantiate a cell
    let cell = UITableViewCell(style: .subtitle, reuseIdentifier: "ElementCell")

    // Adding the right infos
    cell.textLabel?.text = element.symbol
    cell.detailTextLabel?.text = element.name

    // Returning the cell
    return cell
}
Now, you should build and run, and voilà your first table view. But wait ! There is more !
A memory problem
If you build and run the application at the current state, it seems right. But it’s not !
To understand why I’m saying that, during the debug session, use the memory footprint of your app in the Xcode debug console, and pay special attention on the memory as you scroll down and up in the app.
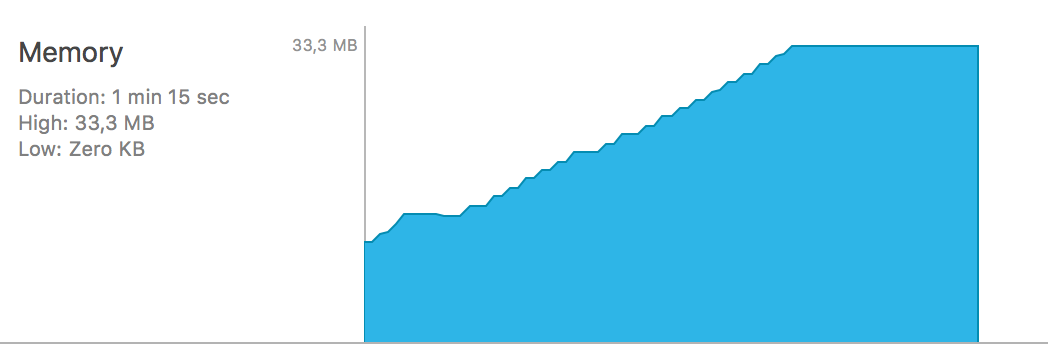
This is not going to end well…
What ? Just 33MB ? And that’s why you say something is wrong ? Yes it is wrong, because we can see that when we scroll, the memory footprint just rise, some memory is never released. Witch mean the app could (and will !) eventually experience a memory crash. (hugh !)
What is going on here ?
Well, remember our implementation of cellForRowAt: indexPath implementation ? It create a new cell every time it is called by the table view. Is it right ? No, it’s not.
What should I do ?
You should reuse the cells. And don’t freak out, it’s very easy to do !
Reusing cells
As I said, it’s very easy to use reusable cells, and we did half the job previously: we already registered a cell for reuse ! Indeed, look at the code instantiating the cell, we have set a reuseIdentifier for the cell. So let just reuse it when we can.
What will be the logic ?
Well, we will try to reuse a cell, and if we cannot do so, we will create a new cell.
Just replace
// Instantiate a cell
let cell = UITableViewCell(style: .subtitle, reuseIdentifier: "ElementCell")// Trying to reuse a cell
let cellIdentifier = "ElementCell"
let cell = tableView.dequeueReusableCell(withIdentifier: cellIdentifier)
?? UITableViewCell(style: .subtitle, reuseIdentifier: cellIdentifier)Now, when initializing a cell, we first try to reuse a cell, using dequeueReusableCell(withIdentifier: _). This function will return a cell if it succeed, and nil if it fails.
Take a look at the second line.
The ?? operator uses the first value if it’s not nil, and will use the second value when the first value is nil.
This way, our cell will be reused if it can, and will be initialized from scratch just like we did before if it fails. We should always have a cell to handle from now on.
To be more specific, the dequeueReusableCell function will fail only the first time, because we did not registered any cell for the given identifier “ElementCell”. But then, dequeuing cells will work just fine, because Apple is able to create new cells when none of them are available for dequeuing.
Final touches
Ok it begins to look right now. But I can enumerate 3 problems:
- There is no title in the navigation bar
- If you touch a cell, it remains gray
- You told us elements would be ordered by atomic number ! (hydrogen first, helium then, etc…)
So, let correct all of that, one to three lines of code per problem !
- in
viewDidLoad, at any placenavigationItem.title = "Periodic Elements"
The navigation item allow to customize how a ViewController will be displayed within a NavigationController. Here, we just want to set a title.
- At the bottom of the file, inside the extension implementing
UITableViewDelegateextension ViewController: UITableViewDataSource, UITableViewDelegate { (...) func tableView(_ tableView: UITableView, didSelectRowAt indexPath: IndexPath) { tableView.deselectRow(at: indexPath, animated: true) } }
As part of the UITableViewDelegate, we implement tableView(_ tableView: UITableView, didSelectRowAt indexPath: IndexPath) that is called as soon as a cell become selected. When it occurs, we ask the table view to deselect the index path with an animation. Witch result a fade out of the selected cell as soon as it is selected, making the user knowing there is nothing to do by selecting cells for now in the application.
- in
viewDidLoad, right belowelements = try! Element.loadFromPlist()This will sort the array right in place. Swift 3 arrays have two functions to sort arrays:elements.sort(by: { $0.atomicNumber < $1.atomicNumber })
sort: Will sort the current array right in place, witch is possible only if the array is stored in avar(mutable). It returns nilsorted: Will return a sorted copy of the array. It’s available on any array, mutating (var) or not (let)
It’s a wrap !
Now when you build the app, it as completely the behavior we expected. If you need it, you can clone or download the project from this branch on Github
Expected result: a simple table view
What to do next ?
I will write the next tutorials, witch should include:
- A detail view to consult every properties of any element
- A search bar to find your element.
- A landscape mode with the element disposed like in the real table
You can also try to do so by yourself; using Apple documentation and any other blog !
Don’t miss a thing!
Don't miss any of my indie dev stories, app updates, or upcoming creations!
Stay in the loop and be the first to experience my apps, betas and stories of my indie journey.